Table of Contents
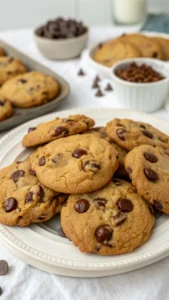
I remember the first time I found cake pop recipes. It was a rainy Sunday, and the kitchen was calling. Those tiny, perfect spheres of deliciousness changed my baking world. They turned ordinary cake into extraordinary treats that spark joy with every bite.
Cake pop recipes have become a big hit, winning hearts with their fun design and versatility. These delightful homemade cake pops are more than just desserts. They’re edible art that brings people together. Whether it’s for a birthday party, wedding, or just a sweet treat, these mini treats are perfect.
What makes homemade cake pops so magical? They’re easy to make, customizable, and impress everyone who tries them. You can make them in classic vanilla or decadent chocolate. You’ll see how simple it is to make these treats in your kitchen.
Get ready for a delicious journey that will improve your baking and delight your taste buds. Your cake pop adventure starts now!
Understanding the Basics of Cake Pop Making
Making cake pops is all about mastering the basics and using the right supplies. Whether you’re new or have baking skills, knowing the basics is key to making perfect treats.
Before you start making cake pops, you need to set up your kitchen. You’ll need the right tools and ingredients for success. Baking well means using the right tools and following the recipe closely.
Essential Tools for Cake Pop Creation
- Stand mixer or hand mixer
- 9×13 inch baking pan
- Cake pop sticks
- Microwave-safe melting bowl
- Cooling rack
- Decorating tools (piping bags, spatulas)
Basic Ingredients Overview
| Ingredient Category | Recommended Options |
|---|---|
| Cake Base | Boxed cake mix or homemade cake recipe |
| Binding Agent | Cream cheese frosting or buttercream |
| Coating | Candy melts or chocolate bark |
Temperature and Timing Considerations
Getting the temperature right is key to making great cake pops. Cake crumbs should be slightly cool when you mix them with frosting. Chocolate coatings melt best between 86-90°F. It’s also important to time your steps right, letting each step cool before moving on.
Pro tip: Chill your cake balls for 15-20 minutes before dipping. This helps them stick to the stick better, making your cake pops look professional.
Classic Vanilla Cake Pop Recipe from Scratch

Making the best cake pop recipe starts with a tasty homemade vanilla cake. This easy guide will show you how to make cake pops that wow your friends and family.
First, make a moist vanilla cake from scratch. You’ll need flour, sugar, eggs, and vanilla extract. Bake it in a 9×13 inch pan and let it cool completely. This step is key for the right cake pop texture.
- Crumble the cooled cake into fine, even pieces
- Prepare a creamy vanilla buttercream frosting
- Mix cake crumbs with just enough frosting to bind
- Roll mixture into uniform balls
The secret to perfect cake pops is in the consistency. Your cake ball mixture should stick together well. Use your hands to shape smooth, compact balls about 1-inch in diameter.
Chill the cake balls for at least 30 minutes before coating. This helps them stay together when you dip them in chocolate. Melt high-quality chocolate or candy melts for a smooth finish.
Pro tip: Use a deep, narrow container for easy chocolate coating and minimal mess!
Your homemade vanilla cake pops will be a delightful treat that looks as amazing as they taste. Remember, practice makes perfect, so don’t worry if your first batch isn’t perfect.
Foolproof Chocolate Coating Techniques
Mastering chocolate coating is key for stunning cake pops. The right coating can elevate your cake pop decorating ideas. It turns simple cake balls into professional treats that wow everyone.
Chocolate coating needs precision and practice. Success comes from knowing how to melt and apply chocolate.
Proper Melting Methods
For cake pop decorating, you have two main melting methods:
- Double Boiler Method
- Provides gentle, even heating
- Prevents chocolate from burning
- Maintains smooth consistency
- Microwave Method
- Faster technique
- Requires careful monitoring
- Use short 15-second intervals
Coating Consistency Tips
Getting the right chocolate coating consistency is an art. You want a smooth, thin layer that sticks well to cake pops.
“The secret to great cake pop decorating ideas is chocolate that flows like silk but holds its shape.”
Troubleshooting Common Coating Issues
Coating problems can ruin cake pop decorating ideas. Here are quick fixes for common issues:
- Thick Chocolate: Add vegetable shortening to thin
- Cracking Coating: Ensure cake balls are chilled
- Uneven Coverage: Tap off excess chocolate gently
Practice makes perfect in cake pop decorating. Don’t worry if your first tries aren’t perfect.
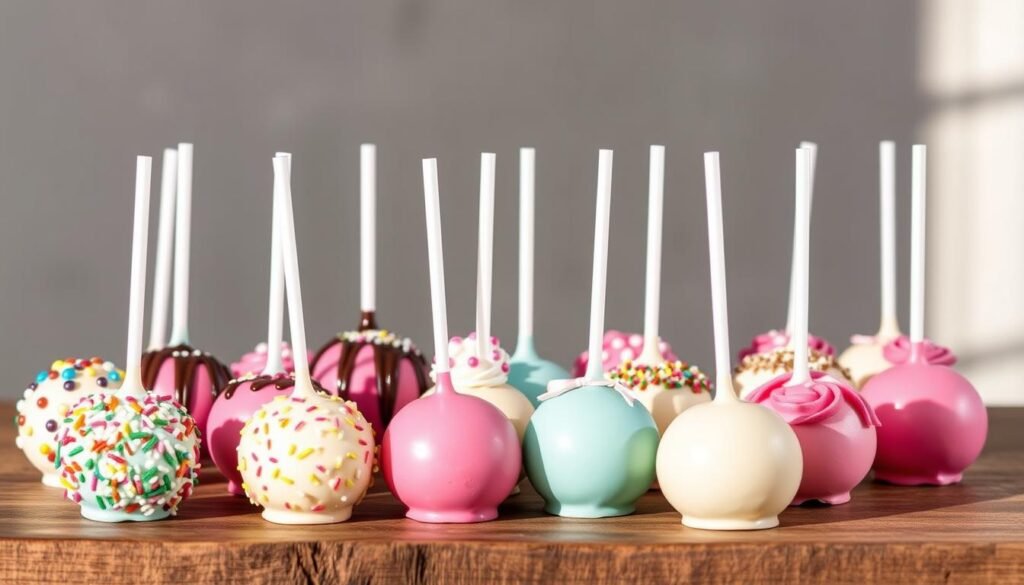
Professional Cake Pop Decorating Ideas

Take your cake pop decorating to the next level with these expert tips. They will turn your treats into stunning works of art. Cake pop decorating is more than just frosting; it’s a chance to be creative and express yourself.
First, learn how to coat your cake pops smoothly with chocolate. This base layer is key for amazing designs. Use top-notch chocolate in different colors to make your cake pops pop.
- Use tempered chocolate for a glossy, professional finish
- Experiment with different colored candy melts
- Create gradient effects by blending multiple chocolate colors
When you get into advanced decorating, precision is everything. Here are some pro tips to make your cake pops shine:
- Use edible markers for intricate detailing
- Apply delicate sprinkle patterns
- Create themed designs with stencils
- Incorporate metallic edible paint for elegant touches
“The difference between good and great cake pops is in the details.” – Professional Baker
Themed decorations can really make your cake pops stand out. Whether it’s for a wedding, birthday, or holiday, match your decorations to the event. This makes your treats unforgettable.
Getting better at cake pop decorating takes practice. Start with simple designs and then try more complex ones. Remember, there’s no limit to your creativity in cake pop decorating!
Popular Cake Pop Recipes for Every Occasion
Cake pops are the perfect bite-sized dessert for any celebration. They can turn any event into a memorable one. Whether it’s a birthday party, holiday gathering, or wedding reception, these treats offer endless possibilities.
Trying out different cake pop flavors lets you customize treats for any occasion. From classic favorites to unique combinations, there’s a recipe for every taste and event.
Birthday Cake Pops That Wow
Birthday cake pops are a hit that makes any celebration special. These festive treats come in exciting designs and flavors:
- Classic vanilla with colorful sprinkles
- Chocolate birthday cake pops with vibrant decorations
- Funfetti-style cake pops that kids and adults love
Seasonal Holiday Variations
Celebrate each season with themed cake pop flavors. They capture the spirit of the moment:
- Autumn: Pumpkin spice cake pops
- Winter: Peppermint chocolate designs
- Spring: Pastel-colored lemon cake pops
- Summer: Tropical fruit-inspired flavors
Elegant Wedding Cake Pops
For weddings, cake pops offer a sophisticated dessert option. Consider elegant designs that match your wedding theme:
- Elegant white and silver decorations
- Matching wedding color scheme
- Delicate flavor combinations like champagne or lavender
Pro tip: When making cake pops for special occasions, match the flavor and design to the event’s theme. This will have the biggest impact.
Storage and Make-Ahead Tips
Learning how to store cake pops is key for cake pop makers. It helps keep your treats fresh for longer. Knowing the right storage methods ensures your cake pops stay delicious for days or weeks.
For short-term storage, cake pop makers have a few good options. Storing them at room temperature is best for 1-2 days. This works well if you’ve used a stable coating like chocolate or candy melts.
Storage Duration Guidelines
| Storage Method | Duration | Recommended Conditions |
|---|---|---|
| Room Temperature | 1-2 days | Airtight container, away from direct sunlight |
| Refrigerator | Up to 1 week | Sealed container, wrapped individually |
| Freezer | Up to 6 weeks | Wrapped tightly in plastic wrap, then placed in freezer bag |
Freezing is great for long-term storage. Wrap each cake pop in plastic wrap, then in a freezer-safe bag. Pro tip: Thaw frozen cake pops in the refrigerator overnight for best results.
- Always use airtight containers to prevent moisture
- Keep cake pops away from strong-smelling foods
- Let refrigerated or frozen cake pops come to room temperature before serving
By using these storage tips, you can make cake pops ahead of time. This is perfect for parties, events, or just having a sweet treat ready when you want one.
Expert Tips for Perfect Cake Ball Formation

Making the perfect cake ball is an art that needs precision and practice. To master cake ball recipes, you must understand the key techniques. These techniques turn simple cake crumbs into delightful treats.
The success of cake ball recipes depends on the right mixture and technique. Focus on two main things: mixing ratios and shaping techniques.
Mastering the Mixing Ratio
Getting the right balance between cake crumbs and frosting is key. Here’s a professional guide:
- Ideal ratio: 3 cups cake crumbs to 1/4-1/2 cup frosting
- Mix thoroughly to ensure even moisture distribution
- Avoid adding too much frosting, which can make balls too soft
Rolling and Shaping Secrets
Your technique for forming cake balls is crucial. Professional bakers suggest these strategies:
- Chill the cake mixture for 15-20 minutes before rolling
- Use clean, slightly damp hands when forming balls
- Apply gentle, consistent pressure while rolling
- Aim for uniform size (about 1-1.5 inches in diameter)
Pro tip: Refrigeration is your secret weapon. Chilling the mixture helps prevent cracking and makes the cake balls easier to handle during the coating process.
Practice makes perfect with cake ball recipes. Don’t get discouraged if your first attempts aren’t flawless. Each batch will improve your technique and confidence.
Creative Flavor Combinations and Mix-ins
Turning cake pops into something special starts with trying new flavors. Your creativity can make these small treats into something amazing. They will surprise and please everyone who tries them.
Here are some exciting flavor mixes to elevate your cake pops:
- Salted Caramel Explosion: Mix rich caramel cake with a touch of sea salt for a fancy twist
- Cookies and Cream Dream: Add crushed chocolate sandwich cookies to vanilla cake for a beloved classic
- Tropical Coconut Lime: Mix coconut cake with zesty lime for a cool summer treat
- Mocha Espresso Delight: Blend chocolate cake with strong coffee for a rich flavor
For unique cake pop flavors, try these mix-in tips to add depth and texture:
- Use crushed nuts for a crunchy bite
- Include dried fruit for a sweet touch
- Add chocolate chips for more indulgence
- Try spices like cinnamon or cardamom for a unique taste
The key to great cake pop flavors is finding the right balance. Don’t be shy to experiment and create your own special flavors. This will make your cake pops truly unique.
How to Start a Cake Pop Business
Turning your love for cake pops into a business needs careful planning and creativity. The baking world is full of chances for those who make tasty and pretty treats.
Crafting Your Pricing Strategy
When starting your cake pop business, setting prices is key. Homemade cake pops usually cost between $1.50 and $3 each. Starbucks cake pops are about $2.25 to $2.45. Your prices should consider:
- Ingredient quality
- Labor time
- Local market rates
- Unique design complexity
Packaging and Presentation Essentials
Good packaging can make your cake pop business stand out. Use clear boxes, ribbons, and custom labels that show your brand’s style. Consistent branding helps customers remember and share your treats.
Effective Marketing Techniques
Promote your cake pop business with smart marketing:
- Create an Instagram-worthy display
- Develop a strong social media presence
- Participate in local farmers markets
- Offer sample tastings at community events
| Marketing Channel | Potential Reach | Cost |
|---|---|---|
| High | Low | |
| Local Events | Medium | Medium |
| Facebook Ads | High | Variable |
Success in the cake pop business comes from passion, creativity, and consistent quality. Start small, listen to customer feedback, and keep improving your skills.
Conclusion
Making homemade cake pops is more than just baking. It’s a chance to be creative and share tasty treats with others. You’ve learned how to make perfect cake pops, from picking ingredients to decorating them.
Now, you can make cake pops for any event. They’re great for birthdays, holidays, or just a sweet treat. You can try new flavors and designs with the skills you’ve gained.
Enjoy making these small desserts. Share them with your loved ones and add your own twist to each batch. Your kitchen can become a place of fun and creativity, making special memories.
We encourage you to keep making cake pops. Share your photos, swap recipes, and most importantly, have fun. Your cake pop journey is just starting, and there’s so much to explore.
FAQ
How long do cake pops stay fresh?
What’s the secret to preventing cake pops from falling off the stick?
Can I make cake pops without a cake pop maker?
How much does it cost to make homemade cake pops?
How long do cake pops stay fresh?
What’s the secret to preventing cake pops from falling off the stick?
Can I make cake pops without a cake pop maker?
How much does it cost to make homemade cake pops?
FAQ
How long do cake pops stay fresh?
Cake pops stay fresh for 3-4 days at room temperature in an airtight container. Refrigeration can extend this to a week. Freezing them for 4-6 weeks is also an option, provided they’re wrapped individually.
What’s the secret to preventing cake pops from falling off the stick?
To prevent cake pops from falling, dip the stick in melted chocolate first. This creates a strong bond. Ensure your cake balls are chilled and not too soft. Dip the stick halfway into the ball. Let them set in a styrofoam block or stand.
Can I make cake pops without a cake pop maker?
Yes, you can make cake pops without a maker. Simply crumble cake, mix with frosting, form balls, and coat them. This method allows for more flavor and design options.
How much does it cost to make homemade cake pops?
Homemade cake pops cost between
FAQ
How long do cake pops stay fresh?
Cake pops stay fresh for 3-4 days at room temperature in an airtight container. Refrigeration can extend this to a week. Freezing them for 4-6 weeks is also an option, provided they’re wrapped individually.
What’s the secret to preventing cake pops from falling off the stick?
To prevent cake pops from falling, dip the stick in melted chocolate first. This creates a strong bond. Ensure your cake balls are chilled and not too soft. Dip the stick halfway into the ball. Let them set in a styrofoam block or stand.
Can I make cake pops without a cake pop maker?
Yes, you can make cake pops without a maker. Simply crumble cake, mix with frosting, form balls, and coat them. This method allows for more flavor and design options.
How much does it cost to make homemade cake pops?
Homemade cake pops cost between $0.50 to $1.50 each. This is much cheaper than Starbucks, which charges $2.25-$3.50 per pop. Making large batches can save a lot of money.
What’s the best chocolate for coating cake pops?
Use candy melts or high-quality melting wafers for coating. They melt smoothly and harden quickly. Avoid regular chocolate chips. Wilton or Ghirardelli are good brands for melting chocolates.
How can I prevent my cake pops from cracking?
Cracking is often due to temperature changes. Chill your cake balls well before dipping. Let them warm slightly before coating. Avoid sudden temperature changes. Let them cool at room temperature after coating.
Can I make cake pops gluten-free?
Yes, you can make gluten-free cake pops. Use gluten-free cake mix or homemade cake with gluten-free flour. Check all ingredients, including sprinkles and chocolate, for gluten-free options. Many brands offer gluten-free alternatives.
How far in advance can I make cake pops for an event?
You can make cake pops up to 3 days in advance. Bake the cake and form balls up to a week ahead. Store them in the fridge. Coat and decorate 1-2 days before the event for the best look and taste.
FAQ
How long do cake pops stay fresh?
Cake pops stay fresh for 3-4 days at room temperature in an airtight container. Refrigeration can extend this to a week. Freezing them for 4-6 weeks is also an option, provided they’re wrapped individually.
What’s the secret to preventing cake pops from falling off the stick?
To prevent cake pops from falling, dip the stick in melted chocolate first. This creates a strong bond. Ensure your cake balls are chilled and not too soft. Dip the stick halfway into the ball. Let them set in a styrofoam block or stand.
Can I make cake pops without a cake pop maker?
Yes, you can make cake pops without a maker. Simply crumble cake, mix with frosting, form balls, and coat them. This method allows for more flavor and design options.
How much does it cost to make homemade cake pops?
Homemade cake pops cost between
FAQ
How long do cake pops stay fresh?
Cake pops stay fresh for 3-4 days at room temperature in an airtight container. Refrigeration can extend this to a week. Freezing them for 4-6 weeks is also an option, provided they’re wrapped individually.
What’s the secret to preventing cake pops from falling off the stick?
To prevent cake pops from falling, dip the stick in melted chocolate first. This creates a strong bond. Ensure your cake balls are chilled and not too soft. Dip the stick halfway into the ball. Let them set in a styrofoam block or stand.
Can I make cake pops without a cake pop maker?
Yes, you can make cake pops without a maker. Simply crumble cake, mix with frosting, form balls, and coat them. This method allows for more flavor and design options.
How much does it cost to make homemade cake pops?
Homemade cake pops cost between $0.50 to $1.50 each. This is much cheaper than Starbucks, which charges $2.25-$3.50 per pop. Making large batches can save a lot of money.
What’s the best chocolate for coating cake pops?
Use candy melts or high-quality melting wafers for coating. They melt smoothly and harden quickly. Avoid regular chocolate chips. Wilton or Ghirardelli are good brands for melting chocolates.
How can I prevent my cake pops from cracking?
Cracking is often due to temperature changes. Chill your cake balls well before dipping. Let them warm slightly before coating. Avoid sudden temperature changes. Let them cool at room temperature after coating.
Can I make cake pops gluten-free?
Yes, you can make gluten-free cake pops. Use gluten-free cake mix or homemade cake with gluten-free flour. Check all ingredients, including sprinkles and chocolate, for gluten-free options. Many brands offer gluten-free alternatives.
How far in advance can I make cake pops for an event?
You can make cake pops up to 3 days in advance. Bake the cake and form balls up to a week ahead. Store them in the fridge. Coat and decorate 1-2 days before the event for the best look and taste.
What’s the best chocolate for coating cake pops?
How can I prevent my cake pops from cracking?
Can I make cake pops gluten-free?
How far in advance can I make cake pops for an event?
.50 to
FAQ
How long do cake pops stay fresh?
Cake pops stay fresh for 3-4 days at room temperature in an airtight container. Refrigeration can extend this to a week. Freezing them for 4-6 weeks is also an option, provided they’re wrapped individually.
What’s the secret to preventing cake pops from falling off the stick?
To prevent cake pops from falling, dip the stick in melted chocolate first. This creates a strong bond. Ensure your cake balls are chilled and not too soft. Dip the stick halfway into the ball. Let them set in a styrofoam block or stand.
Can I make cake pops without a cake pop maker?
Yes, you can make cake pops without a maker. Simply crumble cake, mix with frosting, form balls, and coat them. This method allows for more flavor and design options.
How much does it cost to make homemade cake pops?
Homemade cake pops cost between $0.50 to $1.50 each. This is much cheaper than Starbucks, which charges $2.25-$3.50 per pop. Making large batches can save a lot of money.
What’s the best chocolate for coating cake pops?
Use candy melts or high-quality melting wafers for coating. They melt smoothly and harden quickly. Avoid regular chocolate chips. Wilton or Ghirardelli are good brands for melting chocolates.
How can I prevent my cake pops from cracking?
Cracking is often due to temperature changes. Chill your cake balls well before dipping. Let them warm slightly before coating. Avoid sudden temperature changes. Let them cool at room temperature after coating.
Can I make cake pops gluten-free?
Yes, you can make gluten-free cake pops. Use gluten-free cake mix or homemade cake with gluten-free flour. Check all ingredients, including sprinkles and chocolate, for gluten-free options. Many brands offer gluten-free alternatives.
How far in advance can I make cake pops for an event?
You can make cake pops up to 3 days in advance. Bake the cake and form balls up to a week ahead. Store them in the fridge. Coat and decorate 1-2 days before the event for the best look and taste.
.50 each. This is much cheaper than Starbucks, which charges .25-.50 per pop. Making large batches can save a lot of money.
What’s the best chocolate for coating cake pops?
Use candy melts or high-quality melting wafers for coating. They melt smoothly and harden quickly. Avoid regular chocolate chips. Wilton or Ghirardelli are good brands for melting chocolates.
How can I prevent my cake pops from cracking?
Cracking is often due to temperature changes. Chill your cake balls well before dipping. Let them warm slightly before coating. Avoid sudden temperature changes. Let them cool at room temperature after coating.
Can I make cake pops gluten-free?
Yes, you can make gluten-free cake pops. Use gluten-free cake mix or homemade cake with gluten-free flour. Check all ingredients, including sprinkles and chocolate, for gluten-free options. Many brands offer gluten-free alternatives.
How far in advance can I make cake pops for an event?
You can make cake pops up to 3 days in advance. Bake the cake and form balls up to a week ahead. Store them in the fridge. Coat and decorate 1-2 days before the event for the best look and taste.
Tags:
DIY cake pops / Easy dessert ideas / Homemade cake pop recipes